Burlap Thanksgiving Table Setting Tutorial
Thanksgiving is well on its way, so planning your own dinners will be playing on your mind. Part of this special holiday is gathering around the table which is filled with yummy food and often beautiful fall-inspired decorations. If you’re not one to head to the store to spend a fortune on your table settings, then why not get your crafting kit out and try our DIY burlap table setting?
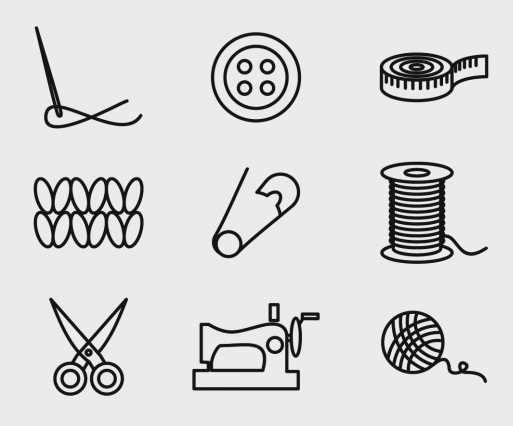
Tools & Materials

- Burlap fabric
- Twine
- Scissors
- Needle (with an eye big enough for your twine)
- Glitter card stock (or colored)
- Wire
- Wire cutters (not pictured)
- Pliers (not pictured)
- Glue
- Wooden buttons
To make multiples of this cute burlap cutlery place setting, you may want to do each step for all of your pouches before moving on to the next. Then you can have a sort of production line – you could even enlist the help of another family member to speed things along.
Step 1

Start by cutting your burlap into a strip which is big enough for your cutlery to fit in. Lay out your fabric underneath the cutlery to work out the length you need, plus extra for folding back to make the basic shape of the pouch.
Step 2

Use your twine to sew the edges together (to form the pouch). We used a blanket stitch for a little more of a decorative look.
Check out this tutorial for a more in-depth look at a blanket stitch – you might even want to add beads to the edge of your design to add a bit more color.
Step 3

Now, it’s time to make the leaves. You can probably gauge by eye how big your fall leaves should be, so draw out some templates on a scrap piece of paper before cutting into your glitter card.
Once these are cut out, you’ll be able to test the proportions on the front of your burlap pouch.
Step 4

Draw around each of your leaves onto the back of your glitter card and then cut them out. We chose to create 3 different shaped leaves and three fall colors, but you could change this up however you want!
Step 5

Decide on how you want the leaves to be placed before adding the wire. When you know where the leaves are going to sit, you can cut lengths of wire to suit.
Create enough curls of wire for your leaves – this is so there is a larger surface area to work with when you glue them down.
Glue the wires to the leaves with a relatively strong glue and give them plenty of time to dry.
Step 6

a) While your glue is drying, use some more burlap to create a bow. Cut a strip at whichever width you feel will work for your design and then sew this together with twine.

b) A simple way to do this is to create a running stitch down the center, this will draw the middle of the bow in and form that cute bow shape. Tie this in a secure knot to hold and take one of your tail ends of twine around the center to pull it in even tighter in the middle.

c) Thread a button over the middle of your burlap bow and tie it securely to the back.
Step 7

Wrap your leaf wires together, making sure to place them at the angles and places you want them to sit. You could trial a layout on your pouch to make sure you get it right first time.
Step 8

Loop your combined leaf wires to the back of the bow, then use twine to tie your embellishment to the pouch.
Last but not least, pop in your cutlery and you’ve just made a really seasonal place setting for your family Thanksgiving dinner. If you keep these stored safely, you could bring them out every November – just make sure no one gets cranberry sauce or gravy on your beautiful creations!

You don’t need to stick to the fall leaves for your own design, you could use a turkey or pumpkins for example. You may even want to personalize your place settings with the names of your guests. Everyone will appreciate the effort you put into the table decoration and you’ll probably end up on their “I am thankful for…” lists for both the food and the amazing settings you made especially for everyone.
Have a wonderful Thanksgiving from all of us here at Sew McCool!